Table of Contents
- Why Headlights Turn Yellow: The Main Culprits
- Cloudy vs. Yellow: Understanding Headlight Deterioration
- How to Restore Cloudy Headlights Safely
- How to Prevent Headlights from Yellowing
- Understanding Headlight Restoration Cost and Value
- When to Restore vs. Replace Your Headlights
- Frequently Asked Questions
Last Updated: October 18, 2026
Why Headlights Turn Yellow: The Main Culprits
Most lenses are made from polycarbonate plastic, not glass, durable, but vulnerable to sun, weather, and road conditions. Here's what actually causes headlights to yellow and fade.
UV Rays and Sunlight Damage
Ultraviolet rays from sunlight are the primary culprit behind headlight yellowing. The sun's UV exposure breaks down the protective clear coat on your headlight lens. When that coating fails, the polycarbonate plastic underneath starts to oxidize. This happens faster in high-altitude areas where UV rays are more intense (Climate Prediction Center).
The damage is cumulative: each day of sun weakens the protective layer a little more, and after a few years it becomes visible. That's why vehicles in sunny climates yellow faster than those in cloudier regions.
Oxidation of the Polycarbonate Lens
Oxidation is the chemical process where the polycarbonate plastic reacts with oxygen in the air. Once the clear coat protective layer wears away, oxidation speeds up dramatically. The plastic develops a cloudy, hazy appearance as tiny cracks form on the surface.
The oxidation creates a dull, yellowed finish that scatters light instead of transmitting it clearly, reducing nighttime visibility and making your vehicle look older. The process is gradual at first, then accelerates once the coating is compromised.
Road Grime, Debris, and Environmental Contaminants
Gravel, dirt, dust, and pollutants accumulate on the lens surface and embed into tiny cracks and scratches, making the lens look permanently cloudy.
Road salt in winter accelerates degradation, and exhaust and industrial pollutants also damage the protective coating. Combined with UV exposure, this creates the yellow, hazy appearance many drivers notice.
Regular washing helps, but it cannot prevent the underlying oxidation. Once the clear coat fails, surface dirt makes the problem worse.
Weathering and General Wear
Constant temperature changes make the polycarbonate expand and contract, creating micro-fractures in the protective coating. Rain, snow, hail, and wind all contribute to the breakdown.
In Colorado, intense sun, hail, and temperature swings create ideal conditions for deterioration. A headlight that stays clear in a mild climate may yellow within a few years here, since high altitude and dry air accelerate UV damage.
Even with perfect care, headlights eventually yellow, the protective coating was never designed to last forever.
Cloudy vs. Yellow: Understanding Headlight Deterioration
Cloudy and yellow headlights are related but slightly different. A cloudy lens appears hazy and opaque, scattering light in all directions; a yellow lens has taken on an amber or brownish tint.
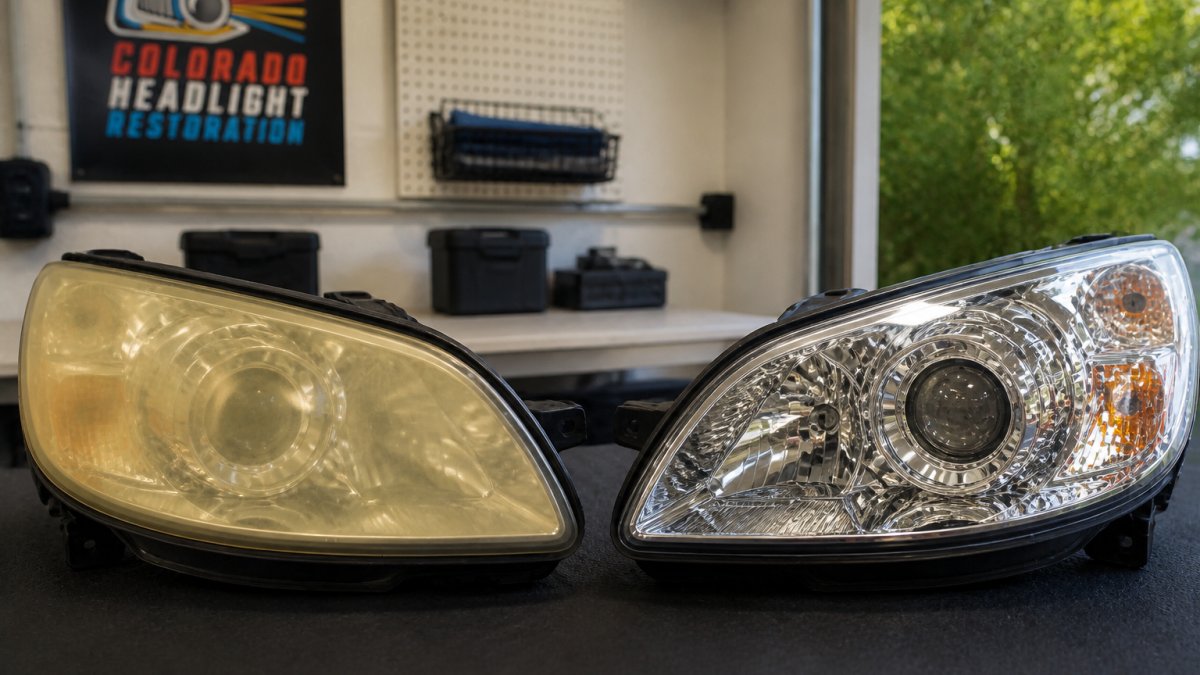
Cloudiness usually indicates advanced oxidation: the clear coat has failed completely and the plastic itself is degrading. Yellowing can happen with an intact clear coat that has simply turned amber with age.
The distinction matters for diagnosis: slightly yellow but clear means the coating may still be working; cloudy and hazy means it has failed and oxidation is active. Either way, restoration removes the damaged layer and applies a fresh protective sealant.
How to Restore Cloudy Headlights Safely
Before you buy a kit or book a service, diagnose what you're looking at. Restoration only works on the outside of the lens, if the damage is inside the housing, polishing won't fix it.
Step 1: Diagnose Exterior vs. Internal Damage
Run this simple check before doing anything else:
- The water test. Spray the lens with clean water and look at it while wet. If the haze disappears or fades significantly when wet, the damage is on the exterior surface and polishing will help. If the haze remains visible through the water, the problem is inside the lens or in the plastic itself.
- The fingernail test. Drag a fingernail lightly across the lens. A rough, chalky, or peeling surface indicates failed clear coat and exterior oxidation. A smooth surface with visible haze points to internal issues.
- The condensation check. Look for water droplets, fog that changes with temperature, or a visible water line inside the housing. Any of these indicate a seal failure, cracked housing, or failed vent, which polishing cannot correct.
- The crack and reflector check. Inspect for cracks, chips, or a dull, corroded, or flaking reflector inside the housing. A damaged reflector or cracked lens means replacement, not restoration.
Step 2: Restore the Exterior Surface
If the diagnosis points to exterior oxidation, the process is straightforward, but materials matter more than technique.
What you need:
- Painter's tape and plastic sheeting to mask paint and trim
- A spray bottle of water with a drop of mild soap
- Wet-sanding paper in progressive grits (commonly 800, 1500, and 2000, then 3000 if available)
- A polishing compound and a foam or microfiber pad
- A UV-blocking clear coat or ceramic sealant made for polycarbonate
- Nitrile gloves and eye protection
The process:
- Wash the lens with soap and water and dry it. Mask the surrounding paint and trim.
- Wet-sand with the coarsest grit first, keeping the surface wet, until the yellow layer is removed and the slurry runs clear. Work in overlapping passes.
- Step up through the finer grits, cleaning the lens between steps, until the surface is uniformly smooth.
- Polish with compound on a foam pad until clarity returns. Wipe residue with a clean microfiber cloth.
- Apply the UV-blocking coating per its instructions. This step is not optional; without it, the bare polycarbonate will yellow again faster than before.
- Let the coating cure fully before driving, per the product label.
Realistic durability: A careful DIY job with a quality UV clear coat typically holds up for several months to about a year, depending on sun exposure and washing habits; basic kit coatings often fail sooner. Expect to reapply periodically, especially on a vehicle parked outside.
Step 3: Know When to Stop and Replace
Stop and consider replacement if any of the following are true:
- The lens is cracked, chipped, or missing pieces
- There is standing water or persistent condensation inside the housing
- The internal reflector is corroded, dull, or flaking
- The housing is warped or the mounting tabs are broken
- The lens is deeply pitted or has damage that sanding cannot remove without thinning the plastic too far
When unsure, a professional inspection is worthwhile, most shops can tell within minutes whether restoration will hold. If not, replacement is the honest recommendation, and a good shop will say so rather than sell a service that won't last.
How to Prevent Headlights from Yellowing
Prevention is always easier than restoration. A few simple habits can slow headlight deterioration significantly.
Park in shade when possible. Direct sun accelerates UV damage; a garage, carport, or covered spot makes a huge difference.
Wash your headlights regularly. Dirt and grime accelerate oxidation once the clear coat begins failing.
Apply a protective coating. After restoration, a quality ceramic sealant creates a barrier between the polycarbonate and UV rays.
A few minutes of care each month extends the life of your headlights by years.
Understanding Headlight Restoration Cost and Value
Compare restoration to replacement: a full headlight assembly costs hundreds of dollars per unit, often over $300-400 depending on your vehicle, and some luxury vehicles cost significantly more.
Restoration costs a fraction of that price while improving nighttime visibility, refreshing your vehicle's appearance, and extending the life of your existing headlights.
Restoration is also faster and more convenient.
Professional durability has improved dramatically: ceramic sealants used by modern shops can offer significant protection, making the cost per year of protection very reasonable.
When to Restore vs. Replace Your Headlights
Most yellowed or cloudy headlights can be restored, but not all. Use the framework below to decide, and base the choice on condition, cost, effort, and how long you plan to keep the vehicle.
The Decision Framework
| Factor | Favor Restoration | Favor Replacement |
|---|---|---|
| Lens condition | Yellowed, hazy, or lightly scratched; no cracks | Cracked, chipped, deeply pitted, or missing pieces |
| Housing and seals | Intact, dry inside | Cracked, leaking, or persistent internal condensation |
| Internal reflector | Bright and intact | Dull, corroded, or flaking |
| Vehicle plan | Keeping it a few more years | Selling soon, or planning a technology upgrade |
| Budget | Lower upfront cost | Higher upfront cost, longer service life |
| Effort | DIY possible, or mobile service | Requires removal and installation |
Cost, Effort, and Longevity Compared
- DIY restoration kit: Roughly $15 to $40 in materials, 1 to 2 hours of work per headlight, and results that typically last several months to about a year with a quality UV coating. Best for a patient owner with a garage and basic tools.
- Professional restoration: Higher upfront cost than a kit, typically 30 to 60 minutes per vehicle, and results that commonly last 2 to 3 years with a ceramic UV sealant. Best for owners who want durability without the labor.
- Full replacement: Commonly $300 to $500 or more per unit depending on the vehicle, 2 to 4 hours of labor or a shop visit, and a service life measured in years. Best when the housing or reflector is damaged, or when upgrading to newer lighting technology.
Restore When:
- The lens is yellowed or cloudy but structurally sound
- The housing is intact and dry inside
- The internal reflector is bright and undamaged
- You plan to keep the vehicle and want to avoid replacement cost
- You need a quick improvement before a safety inspection
Replace When:
- The lens is cracked, shattered, or severely damaged
- The housing is broken, leaking, or has persistent internal condensation
- The internal reflector is damaged or corroded
- The vehicle is older and replacement is more practical than repeated restoration
- You want to upgrade to newer LED or HID technology
A Note on Safety and Inspection
Yellowed or cloudy lenses scatter light and reduce usable beam distance at night, which matters most in rain, fog, and unlit areas. Many state inspection programs check headlight aim and function, and a badly hazed lens can contribute to a failed or marginal inspection. If your lenses are noticeably dim, restoring or replacing them is a safety decision, not just a cosmetic one.
If you are on the fence, get a professional assessment. A good shop will tell you honestly whether restoration will hold or whether replacement is the better path, and that answer is worth more than a sales pitch.
Frequently Asked Questions
Why do plastic headlights turn yellow over time?
Polycarbonate plastic, used in modern headlight lenses, oxidizes when exposed to UV rays and sunlight. The protective clear coat that manufacturers apply gradually breaks down from ultraviolet exposure, road debris, and atmospheric pollutants. This oxidation process causes the yellowing appearance and reduces light output. High-altitude regions with intense sun exposure experience faster degradation than areas with less sun intensity.
How long does headlight restoration last?
DIY restoration kits typically last 2-6 months because they lack the durability of professional-grade finishes. Professional headlight restoration with ceramic UV sealant can last up to three years. The durability depends on the quality of the protective coating applied and whether you park in direct sunlight regularly. Regular washing and applying UV protection products can extend the results.
Can yellowed headlights be restored, or do I need replacement?
Most yellowed headlights can be restored successfully if the lens is not cracked or severely damaged. Restoration removes the oxidized layer and applies a protective sealant to restore clarity and light output. Replacement is necessary only if the lens is broken, has internal condensation, or the damage is too severe. Restoration costs significantly less than replacing entire headlight assemblies, making it the first choice for most vehicle owners.
Does sunlight cause headlights to turn yellow?
Yes, sunlight is a primary cause of headlight yellowing. UV rays penetrate the protective clear coat and cause the polycarbonate lens to oxidize, creating a yellow or cloudy appearance. Vehicles parked outdoors regularly experience faster yellowing than those garaged. High-altitude areas with stronger UV exposure see accelerated degradation. Using a car cover or parking in shade can slow this process significantly.
Learn more about our headlight restoration in Denver, or see headlight restoration in Longmont.
Cloudy headlights? Get your price in 30 seconds.
Mobile service across the Denver metro. Most vehicles finished in 30–60 minutes, right in your driveway.