Last Updated: October 29, 2026
Quick Summary
The first signs of headlight UV coating failure are a faint yellow tint, a milky film that won't wash off, and haziness that survives cleaning. Peeling or flaking at the lens edges and a rough, chalky texture confirm the factory clear coat has failed and the polycarbonate underneath is oxidizing.
- Yellowing starts as a light tint and deepens over months as oxidation gets worse.
- A sharp transition edge from clear to hazy is the signature of a lifting coating.
- Fog or droplets on the inside of the lens point to internal condensation, not coating failure.
- Professional refinishing takes 30 to 60 minutes and lasts up to about 3 years.
- The biggest predictor of restoration lifespan is how completely the old coating was removed.
Table of Contents
- Why Headlight Lenses Cloud Over and How UV Coating Fails
- 7 Visible Signs Your Headlight UV Coating Is Failing
- Headlight UV Coating Peeling: How to Confirm It's Not Just Dirt or Moisture
- How Coating Failure Diminishes Light Output and Beam Strength
- How to Restore Oxidized Headlights: DIY vs Professional
- Headlight UV Protection Lifespan: What to Expect and How to Extend It
- Headlight Restoration vs Replacement: Which Makes Sense for Your Vehicle?
- Book Your Mobile Headlight Restoration Appointment
- Frequently Asked Questions
Why Headlight Lenses Cloud Over and How UV Coating Fails
The first signs of headlight UV coating failure usually show up as a faint yellow tint or a milky film that won't wash off. Most drivers assume the lens itself has gone bad.
Your headlights aren't bare plastic. They're polycarbonate, which would break down fast in the sun without help. The factory sprays on a UV protective coating during assembly. That coating is the shield.
The Role of the Factory Clear Coat
The factory clear coat is a thin, hard layer applied over the polycarbonate lens. It blocks ultraviolet light and seals the plastic from moisture and road chemicals.
This layer is only microns thick and can't be sanded and re-sprayed at home the way paint can. Once it breaks down, it has to be removed and replaced with a new protective sealant.
UV Exposure and Oxidation of Polycarbonate
Polycarbonate is strong, but it's sensitive to sunlight. UV exposure breaks the chemical bonds in the plastic over time. That process is called oxidation, and it turns the clear lens yellow, then brown.
High altitude makes this worse. Why Colorado's UV levels age headlights faster explains how Denver's elevation accelerates the oxidation you're reading about. Colorado's high-elevation sun exposure means more UV reaches your vehicle than at sea level.
7 Visible Signs Your Headlight UV Coating Is Failing
Watch for these seven signs, in rough order of how often we see them:
- Yellowing across the whole lens face
- Haziness that won't clear after a wash
- Milky or frosted appearance in patches
- Peeling or flaking at the lens edges
- Rough texture you can feel with a fingertip
- A raised edge where the coating is lifting
- Dull light output that makes night driving harder
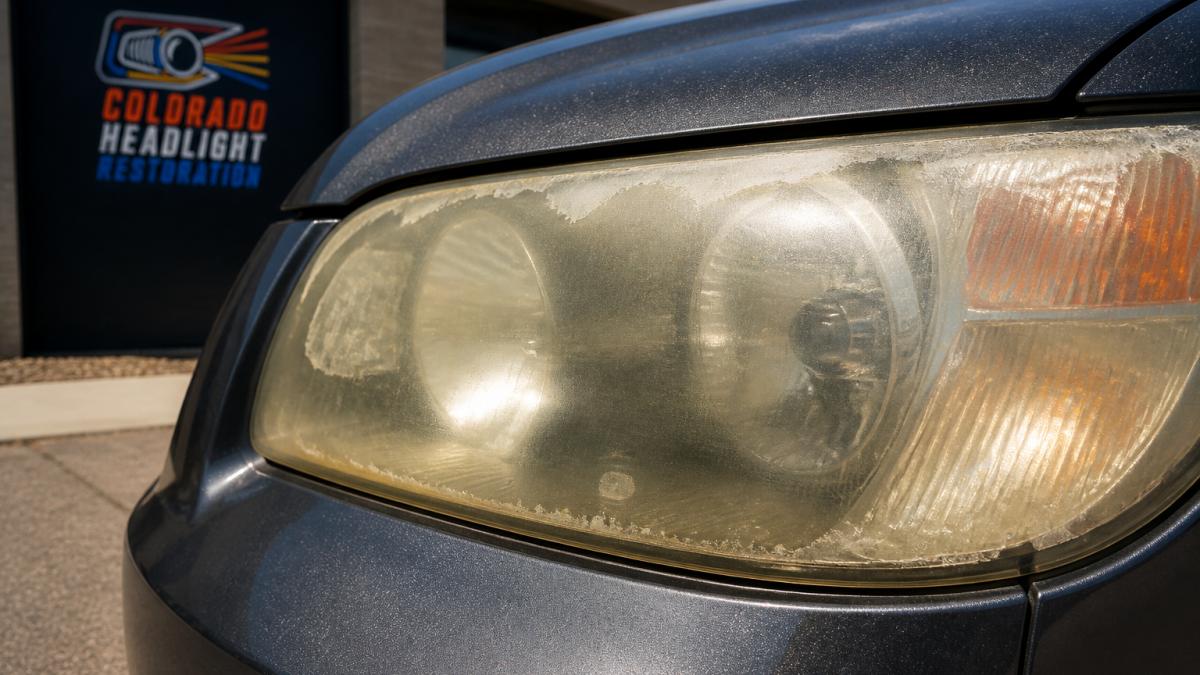
Yellowing, Haziness, and Discoloration
Yellowing starts as a light tint and deepens over months. Haziness looks like a thin fog trapped inside the plastic. Discoloration can shift from yellow to a brown tint as oxidation gets worse.
Peeling, Flaking, and Rough Texture
Coating peeling is the clearest sign of failure. You'll see edges lifting, like sunburned skin. Flaking leaves small white specks on the lens. Run a finger across the surface. A rough texture or a raised edge means the protective layer is delaminating from the plastic.
Headlight UV Coating Peeling: How to Confirm It's Not Just Dirt or Moisture
Before you price a restoration, confirm what actually failed. Cloudy, yellow, or patchy lenses can come from four different causes, and only one is UV coating failure. Treating the wrong cause wastes money and can make the lens worse.
The Four Causes Behind a Cloudy Lens
- UV coating failure, the factory clear coat has oxidized, thinned, or delaminated, exposing the polycarbonate underneath.
- Surface contamination, road film, wax residue, tar, or hard-water minerals sitting on top of an intact coating.
- Internal condensation, moisture trapped inside the housing because a seal, vent, or bulb gasket failed.
- Physical lens damage, stone chips, sandblasting pits, chemical etching, or stress cracks in the polycarbonate itself.
Each cause has a different fix. Coating failure needs removal and re-coating. Contamination needs a proper wash and possibly a light clay or plastic polish. Condensation needs the housing resealed and dried. Physical damage may need replacement if pits are deep enough to scatter light.
A Step-by-Step Diagnostic Checklist
Work through these steps in order. Stop as soon as you can rule a cause in or out.
- Wash and dry the lens. Use car soap, a soft microfiber cloth, and clean water. Dry fully with a second cloth.
- Inspect in direct daylight, not garage light. Hold a light at a low angle across the lens face. Coating failure shows as a dull, milky sheen; contamination usually looks streaky or spotted.
- Look for a transition edge. A sharp line where the surface changes from clear to hazy is the signature of a lifting coating. Dirt and moisture rarely form a hard edge.
Reading the Result
| What you see | Most likely cause | Next step |
|---|---|---|
| Uniform yellow or milky haze that survives washing | UV coating failure | Restoration or professional refinishing |
| Streaks or spots that wash away | Surface contamination | Proper wash; recheck in a week |
| Fog or droplets on the inside of the lens | Internal condensation | Reseal housing; dry the assembly |
| Isolated pits, chips, or cracks | Physical lens damage | Evaluate for replacement |
| Haze returns within days of polishing | Coating gone, plastic oxidizing | Restoration with a new UV sealant |
If two or more rows apply, treat the most severe cause first. A lens with both internal condensation and coating failure needs the housing sealed before any cosmetic work, or the new coating will trap moisture and fail early.
Once you've confirmed coating failure, the next question is severity. Light yellowing with no peeling often responds well to a DIY kit. Peeling, flaking, or a chalky texture across the whole lens usually calls for professional refinishing, because the old coating has to come off completely before a new one goes on.
How Coating Failure Diminishes Light Output and Beam Strength
A failing coating doesn't just look bad. It steals light. A hazy lens scatters the beam, so less light lands on the road where you need it. Beam strength drops, and the pattern gets fuzzy at the edges.
That matters at night. Dim, scattered light shortens how far you can see and worsens glare for oncoming drivers. If your state inspection checks headlight clarity, a cloudy lens can also cost you a pass.
How to Restore Oxidized Headlights: DIY vs Professional
You have two paths, and both can work. The question is how long you want the result to last.
DIY restoration means sanding off the dead coating, polishing the plastic, and applying a UV sealant. Kits are cheap, but the sealant is often the weak link.
Professional repair does the same prep but finishes with a durable coating and proper curing. For the cleaning side, see our guide on how to clean cloudy headlights.
| Factor | DIY Kit | Professional Refinishing |
|---|---|---|
| Time | 1-2 hours | 30-60 minutes |
| Upfront cost | Low | Moderate |
| Typical lifespan | Weeks to months | Up to 3 years |
| Coating quality | Basic sealant | Ceramic UV sealant |
| Warranty | None | 1-year free re-restoration |
Headlight UV Protection Lifespan: What to Expect and How to Extend It
Lifespan is where most restoration advice falls apart. A kit that looks great on day one can haze over in a month, and a properly applied coating can last years. The difference is preparation, coating compatibility, and curing, not the brand on the box.
What a Durable Repair Actually Involves
A coating only lasts as long as the surface under it. Skipping steps is the most common reason a new sealant fails early.
- Full removal of the old coating. The dead factory layer has to come off completely. Most practitioners wet-sand in stages, typically starting around 800 grit and stepping up through 1500 and 3000 grit, until the surface is uniformly dull and no flakes or edges remain. Leaving patches of old coating traps failure under the new layer.
- Surface prep and cleaning. Sanding residue, oils, and silicone from tire dressings must be removed before coating. A panel wipe or isopropyl alcohol wipe is standard; coating over contamination causes fisheyes and early peeling.
- Coating compatibility. Not every sealant bonds to every plastic. A coating designed for polycarbonate headlights will outlast a general-purpose paint sealant. Two-part clear coats and ceramic UV sealants are the common durable options; wipe-on waxes and spray sealants are not.
- Controlled curing. Most durable coatings need a clean, dust-free environment and a cure window where the vehicle isn't washed or driven in rain. Curing in direct sun or a cold garage can shorten the coating's life.
Realistic Lifespan by Repair Type
| Repair type | Typical lifespan | What shortens it |
|---|---|---|
| DIY kit with spray sealant | Weeks to a few months | Thin sealant, incomplete prep, no curing |
| DIY kit with quality ceramic sealant | Several months to about a year | Sun exposure, wash frequency, application errors |
| Professional refinishing with ceramic UV sealant | Up to about 3 years | Intense sun, outdoor parking, road chemicals |
| Factory-style two-part clear coat | Often the longest service life | Improper cure, incompatible base, poor prep |
These are typical ranges, not guarantees. A vehicle parked outdoors in strong sun will always see shorter life than one kept in a garage.
Severity: When DIY Is Enough and When It Is Not
Use this rough decision guide before you buy a kit:
- Light yellowing, no peeling, no roughness, a DIY kit with a quality ceramic sealant can be a reasonable first attempt.
- Peeling, flaking, or a raised edge, the old coating must be fully removed. DIY is possible, but the sanding step is where most failures happen; professional refinishing is the safer call.
- Chalky texture across the whole lens, or haze that returns within days of polishing, the coating is gone and the plastic is oxidizing. A durable professional coating is the better investment.
Maintenance That Extends Coating Life
- Wash the lenses every couple of weeks with car soap and a soft cloth. Skip abrasive pads and automatic brush washes.
- Avoid parking nose-first into direct afternoon sun when a shaded spot is available.
- Reapply a compatible maintenance topper at the interval the coating maker recommends, if one is specified. Our Colorado Headlight Resource Center offers further headlight care guides and local resources for maintaining protection long term.
Setting Expectations Before You Pay
Ask three questions before any restoration: How much of the old coating will be removed? What specific coating goes on, and how is it cured? What is the stated lifespan and warranty? A shop that cannot answer all three is likely applying a short-life sealant over incomplete prep. For a vehicle-specific look at lens type and OEM replacement cost, see our make and model guide.
Headlight Restoration vs Replacement: Which Makes Sense for Your Vehicle?
The headlight restoration vs replacement call comes down to lens condition and cost. Restoration works when the lens is intact but the coating failed. Replacement makes sense when the housing is cracked or the damage runs deep.
Replacement is expensive. Restoration costs a fraction of replacement and keeps your original parts.
Book Your Mobile Headlight Restoration Appointment
Spotting the signs is step one. Fixing them before they get worse is step two. If your lenses show yellowing, peeling, or dull light output, a restoration can bring back clarity and night visibility.
Colorado Headlight Restoration comes to your home or office. Our mobile service restores OEM clarity in 30 to 60 minutes, applies a ceramic UV sealant for up to 3 years of protection, and backs the work with a 1-year free re-restoration guarantee.
Frequently Asked Questions
How can you tell if headlight UV coating is failing?
Look for yellowing, haziness, or a milky appearance on the lens. Run your fingers over the surface; if it feels rough or you detect a raised edge where the coating is peeling, the UV layer is likely failing. Shine a light at an angle to spot fine cracks or flaking. These signs of headlight UV coating failure mean the protective layer is gone and the polycarbonate beneath is exposed to sun damage.
What does peeling headlight UV coating look like?
Peeling coating often appears as small flakes or sheets lifting at the edges of the lens, sometimes with a white or cloudy border. You might see a distinct line where the clear coat has worn away, leaving a dull, rough patch underneath. In advanced cases, the entire lens looks frosted or has a patchy, uneven texture. This is a clear sign that the factory clear coat has failed and needs attention.
How long does headlight UV protection last?
Aftermarket ceramic UV sealants can protect for up to 3 years with proper maintenance. High-altitude sun, like in Colorado, can shorten that lifespan. Regular washing and parking in shade help extend protection. If you notice early signs of failure, address them promptly to avoid full lens replacement.
Can failed UV coating make headlights hazy again after cleaning?
Yes. If you clean or polish a headlight but the UV coating is already compromised, the underlying polycarbonate remains unprotected. Without a new UV sealant, oxidation and yellowing will return quickly, often within weeks. A proper repair involves removing the failed coating, polishing the lens, and applying a new UV-resistant layer to restore clarity and prevent future damage.
Don't wait for a failed inspection or a dark drive home to act on cloudy lenses. Get started with Colorado Headlight Restoration and see the road clearly again.

Learn more about our headlight restoration in Denver, or see headlight restoration in Longmont.
Cloudy headlights? Get your price in 30 seconds.
Mobile service across the Denver metro. Most vehicles finished in 30–60 minutes, right in your driveway.