
Table of Contents
- Why Headlight Water Damage Happens and What It Looks Like
- Common Headlight Condensation Causes: Seals, Cracks, and Ventilation
- How to Diagnose the Entry Point Before You Repair Anything
- How to Fix Moisture in Headlights: Step-by-Step
- Headlight Assembly Replacement Cost vs. Repair
- Electrical Risks and Why Water Inside a Headlight Matters
- Preventing Water Damage From Rain, Car Washes, and Cold Weather
- Frequently Asked Questions
Last Updated: October 15, 2026
Why Headlight Water Damage Happens and What It Looks Like
The common causes of headlight assembly water damage are widely misunderstood. Many drivers assume any moisture means a cracked lens or failed assembly, but that is rarely true.
A headlight assembly holds the lens, reflector, bulb, and wiring.
Some moisture is normal. The trick is knowing when it crosses the line.
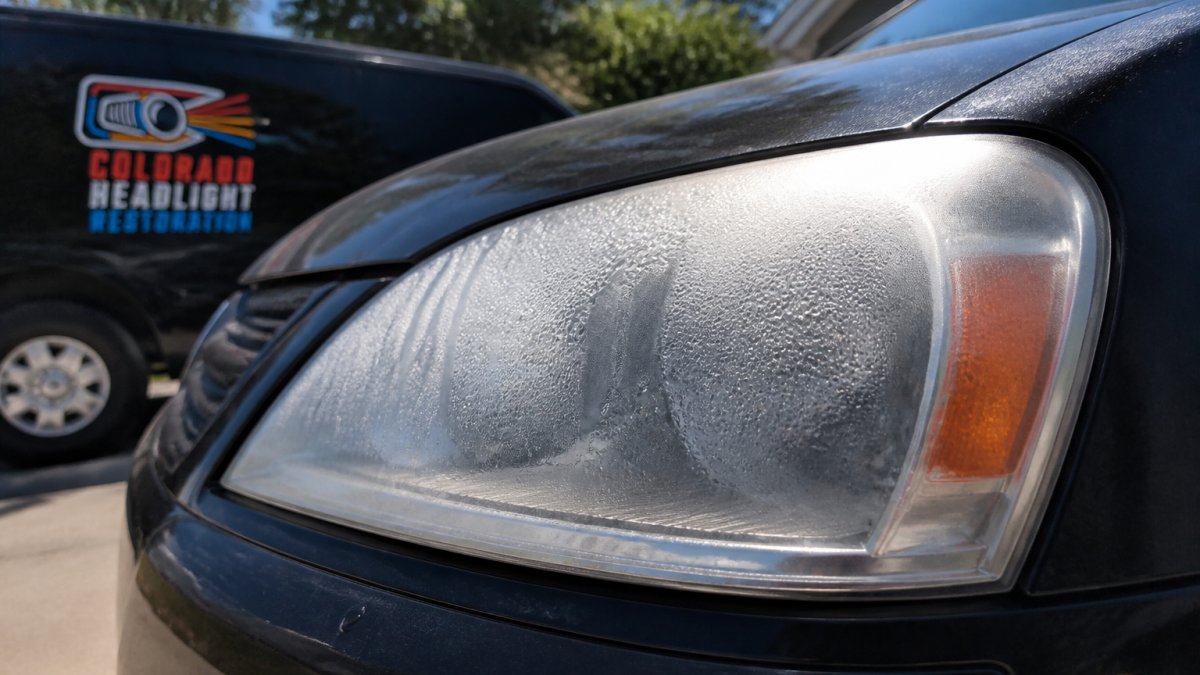
Normal Condensation vs. Water That Shouldn't Be There
Normal condensation is a thin haze that appears after a temperature change. It usually clears within 30 minutes of driving with the lights on.
Water damage looks different. Watch for these signs:
- Large water droplets that cling to the lens
- Standing water pooling at the bottom of the housing
- A milky or cloudy film that never dries out
The SAE lighting standards for automotive lamps treat a light haze as acceptable. Persistent droplets are not. If your lens stays wet for days, water is getting in somewhere it should not.
Common Headlight Condensation Causes: Seals, Cracks, and Ventilation
Most headlight condensation causes come down to three things: a worn seal, a crack, or a blocked vent. Find which applies to your car and the fix becomes obvious.
Damaged Seals and Gaskets
The rubber seal around the lens and the gasket behind the bulb access cover fail first. Heat, cold, and age make rubber brittle, and once it hardens it stops keeping water out.
A common mistake is ignoring the bulb holder gasket. It is small and cheap, but it lets in a surprising amount of water when it dries out.
Cracked Lenses and Blocked Vents
A cracked housing or lens opens a direct path for rain and wash water; small chips near the edge matter most because that is where stress builds. Blocked vents cause the opposite problem: when a vent clogs with dirt, pressure cannot equalize and moisture stays trapped.
How to Diagnose the Entry Point Before You Repair Anything
Do not skip diagnosis. Resealing the wrong spot wastes a weekend and the fog returns on the next rainy drive. Name the entry point before you touch a tube of sealant.
Step 1: Dry the Assembly and Confirm the Moisture Is Real
Remove the bulb and any access cover, then let the housing air out overnight in a warm, dry space. Do not use a heat gun, uneven heat warps the lens and crazes the reflector coating.
Once it is dry, note what you saw before drying:
- Thin haze that cleared within 30 minutes of driving, normal condensation, no repair needed.
- Droplets clinging to the lens or pooling at the bottom, an active leak.
- A milky film that never dried, long-term moisture, likely with early corrosion on the reflector.
That distinction is the whole point of the diagnostic. A haze is a vent doing its job. Droplets are a seal that is not.
Step 2: Inspect the Four Common Entry Points in Order
Work from the most likely failure to the least likely.
- Bulb access cover gasket. Twist or unclip the cover and inspect the rubber ring. If it is flattened, cracked, or shiny from age, it is the prime suspect, the most common entry point on assemblies with a removable rear cover.
- Lens-to-housing seal line. Run a finger along the perimeter where the clear lens meets the black housing. Look for gaps, lifted adhesive, or chalky residue that means the sealant has dried out.
- Vent tubes and vent caps. Find the small rubber elbows or foam filters on the back of the housing. A clogged vent traps moisture; a missing vent cap lets water in directly. Both look like "seal failure" from the driver's seat but have opposite fixes.
- Housing cracks and stress points. Check the mounting tabs, the area around the adjuster screws, and the lower edge of the housing. Cracks here are common after a minor impact or curb strike and are easy to miss behind the bumper cover.
Step 3: Run a Controlled Water Test
This step tells you which suspect is actually leaking.
- Reinstall the bulb access cover and leave the bulb out so you can see inside the housing.
- Use a spray bottle on a mist setting, not a hose and never a pressure washer.
- Start at the top of the lens and work down in slow passes, pausing after each pass to look for a bead of water inside.
A pressure washer forces water past a seal that is perfectly fine and sends you chasing a leak that does not exist. Keep the test gentle.
Step 4: Match the Finding to the Fix
- Cover gasket leaking → replace the gasket, not the whole assembly.
- Seal line leaking → clean and reseal the lens-to-housing joint.
- Vent clogged → clear or replace the vent; do not seal it shut.
Vent locations, access panel designs, and sealing methods vary widely between makes and models; some assemblies use a serviceable gasket while others are sealed at the factory. Before committing to a repair, check the vehicle service information for your specific model.
How to Fix Moisture in Headlights: Step-by-Step
Knowing how to fix moisture in headlights comes down to two jobs: dry the unit, then seal the leak you found. Skip either and the fog returns.
Drying the Assembly and Resealing It
Here is the general process:
- Remove the bulb and any access covers
- Blow low-pressure air through the housing for several minutes
- Let it sit in a warm, dry space overnight
Expected result: a clear lens that stays clear through the next rainstorm. If fog returns within a day, you missed the entry point.
Headlight Assembly Replacement Cost vs. Repair
Headlight assembly replacement cost sends most drivers looking for a repair instead. It depends heavily on the vehicle: a basic halogen assembly and a modern LED unit with integrated ballasts and adaptive motors are not in the same price universe.
What Each Path Actually Costs
These are typical U.S. ranges; your quote varies by make, model, and whether the part is OEM, aftermarket, or salvage.
| Option | Typical Parts Cost (per side) | Typical Labor | Best For |
|---|---|---|---|
| Replace the bulb access gasket | $5-$25 | DIY, under an hour | Dried or flattened cover gasket |
| Reseal the lens-to-housing joint | $10-$40 in sealant and supplies | DIY, 2-4 hours with cure time | Seal line leaks, no structural damage |
| Lens restoration (polish and reseal) | Available on website | 1-2 hours | Cloudy or yellowed lens, no water intrusion |
| Aftermarket replacement assembly | $80-$400 | 1-2 hours | Major cracks, failed internals on older vehicles |
| OEM replacement assembly | $300-$1,500+ | 1-2 hours, plus possible recalibration | LED, adaptive, or projector units; warranty vehicles |
A few things move the number fast:
- LED and adaptive assemblies cost the most because the driver modules and motors are built into the housing and cannot be swapped from the old unit.
- Vehicles with forward-facing camera systems may need recalibration after replacement, adding a shop visit and a separate charge.
- Salvage and aftermarket units cut parts cost but may arrive with worn gaskets or hidden cracks, so inspect before installing.
The Decision Framework
Work through these questions in order. The first "yes" usually settles it.
- Is the housing cracked through, or are the mounting tabs broken? If yes, replace. A crack that runs through the housing cannot be reliably sealed, and a broken tab means the assembly will not sit in the correct beam position.
- Are the internal electronics dead? If the LED driver, ballast, or adaptive motor has failed, replacement is the only real option, those parts are not serviceable on most modern units.
- Is the reflector coating corroded or peeling? Long-term moisture damages the reflective surface, and a reseal will not restore it. A dull, blotchy reflector means the assembly is done.
- Is the leak isolated to a gasket or the seal line, with a clean interior? If yes, repair. This is the case where resealing wins on cost by a wide margin.
- Is the vehicle under warranty or a lease? Check before you touch anything. A DIY reseal can void coverage on the lighting circuit, and a lease may require an OEM part at return.
When Repair Is the Wrong Call
Resealing is a waste of money in three situations: a crack through the housing, a corroded reflector, and a failed internal module. In each case you spend the labor, get a clear lens for a few weeks, and end up buying the assembly anyway.
A Note on Matching Parts
If you do replace, match the assembly to the other side. Mixing a new OEM unit with a faded original creates an obvious brightness and color mismatch at night and can trigger a bulb-out warning. Replacing both sides costs more up front but avoids a second teardown.
Electrical Risks and Why Water Inside a Headlight Matters
Water and electricity do not mix, and a headlight holds both. Moisture reaches the electrical connector, plug connection, and crimp contacts inside the housing, causing oxidation and corrosion.
The results show up in ways drivers do not expect:
- A bulb that flickers or fails early
- A dim or uneven beam pattern
- Corroded pins that ruin the connector
Poor visibility is the bigger safety issue. A foggy lens scatters light, so you see less road and other drivers see you less clearly. Fixing the leak protects both your wiring and your safety.
Preventing Water Damage From Rain, Car Washes, and Cold Weather
Prevention is cheaper than any repair. Rain, car washes, and cold weather are the three main threats, each with a simple counter.
- After rain: check for new droplets along the bottom of the lens
- After a car wash: avoid high-pressure spray aimed at the seal line
- In cold weather: expect light fog, but watch for droplets that stay
As the housing heats and cools, it pulls in air, and any weak seal lets water ride along.
Water finds the weakest point in every headlight, and by the time you notice fog, the leak has usually been there for months.
Frequently Asked Questions
What causes water condensation in car headlights?
Most condensation comes from a failed seal, a cracked lens, or a blocked vent that traps humid air inside the assembly. Temperature changes and cold weather speed this up, since warm air inside the housing condenses on a cool lens. Rain and car washes push water past worn gaskets. If the moisture clears within a day or two, it's usually normal venting. If droplets pool or streak and stay put, you have a leak that needs a repair.
How can you tell whether headlight condensation is normal or a leak?
Normal condensation is a thin, even film that appears after a temperature swing and clears within hours of driving. A leak shows up as large water droplets, streaks running down the lens, or standing water at the bottom of the housing. Run a water test: spray the assembly with a hose and watch for new moisture appearing near a seam, gasket, or bulb access cover. Persistent condensation after that test points to a real leak.
Can water in a headlight cause electrical problems?
Yes. Water reaching the bulb holder, electrical connector, or plug connection can cause corrosion and oxidation on the crimp contacts, which leads to flickering lights, a bulb that fails early, or a dead headlight. In worse cases, water can short the circuit and blow a fuse. If you see green or white corrosion on the connector, dry and clean it before resealing the housing, or the problem will return.
When should you replace a headlight assembly instead of repairing it?
Repair makes sense when the damage is limited to a worn seal, a loose bulb access cover, or a blocked vent. Replacement is the better call when the housing itself is cracked, the lens is broken, or the internal reflector has corroded. Headlight assembly replacement cost varies widely by vehicle, so get a quote before deciding. A reseal is far cheaper, but it won't fix a structurally damaged housing.
Learn more about our headlight restoration in Denver, or see headlight restoration in Longmont.
Cloudy headlights? Get your price in 30 seconds.
Mobile service across the Denver metro. Most vehicles finished in 30–60 minutes, right in your driveway.